C/C++配置
C/C++插件
安装C/C++插件,安装完成后,在vscode中打开一个C/C++项目,会自动生成一个.vscode文件夹,这个文件夹中包含了一些配置文件,这些文件可以帮助vscode自动完成一些任务,比如编译、调试、格式化等。如果没有自动生成也可手动创建。其中比较重要的文件有:
c_cpp_properties.json:这个文件中包含了一些C/C++的配置信息,比如编译器、头文件路径、宏定义等。launch.json:这个文件中包含了一些调试配置信息,比如调试器、调试参数等。tasks.json:这个文件中包含了一些编译配置信息,比如编译器、编译参数等。
task.json
{
    // See https://go.microsoft.com/fwlink/?LinkId=733558
    // for the documentation about the tasks.json format
    "version": "2.0.0",
    "tasks": [
        {//这个大括号里是‘构建’任务
            "label": "echo",//这个大括号里是‘构建’任务
            "type": "shell",//任务类型,process是vsc把预定义变量和转义解析后直接全部传给command;shell相当于先打开shell再输入命令,所以args还会经过shell再解析一遍
            "command": "gcc", //编译命令
            "args": [ //传给gcc命令的一系列参数
                "-g", //生成和调试有关的信息
                "${file}", //指定要编译的是当前文件
                "-o", //指定输出文件的路径和名称
                "${fileBasenameNoExtension}.exe",//让可执行文件输出到源码文件所在的文件夹下的bin文件夹内,并且让它的名字和源码文件相同
                "-fexec-charset=GBK"//解决中文乱码
            ]
        }
    ],
    "presentation": {//执行这个任务时的一些其他设定
        "echo": true,//表示在执行任务时在终端要有输出
        "reveal": "always",//执行任务时是否跳转到终端面板,可以为always,silent,never
        "focus": false,//设为true后可以使执行task时焦点聚集在终端,但对编译来说,设为true没有意义,因为运行的时候才涉及到输入
        "panel": "new", //每次执行这个task时都新建一个终端面板
        "showReuseMessage": true,//控制是否显示“终端将被任务重用, 按任意键关闭”提示.
        "clear": false
    }
}
注意
- 其中的
command和args需要根据自己的实际情况进行修改。 - 其中的
presentation需要根据自己的实际情况进行修改。
launch.json
{
    "version": "0.2.0",
    "configurations": [
        {/*这个大括号里是我们的‘调试(Debug)’配置,这里我解释下为什么写了两个,
        因为有时VSCode会有闪现的问题,也就是运行程序后窗口控制台可能会一闪而过,
        看不到结果,因此可以通过搭建configution的办法来解决,也就是搭建一个cmd的配置。*/
            "name": "(Windows) Launch",// 配置名称
            "type": "cppvsdbg",// 配置类型,cppdbg对应cpptools提供的调试功能;可以认为此处只能是cppdbg
            "request": "launch",// 请求配置类型,可以为launch(启动)或attach(附加)
            "program": "cmd",// 将要进行调试的程序的路径
            "preLaunchTask": "echo", // 调试开始前执行的任务,我们在调试前要编译构建。与tasks.json的label相对应,名字要一样
            "args": [ // 程序调试时传递给程序的命令行参数
                "/C",
                "${fileDirname}\\${fileBasenameNoExtension}.exe",
                "&",
                "echo."
            ],
            "stopAtEntry": false, // 设为true时程序将暂停在程序入口处,相当于在main上打断点
            "cwd": "${workspaceFolder}",// 调试程序时的工作目录,此处为源码文件所在目录
            "environment": [],// 环境变量,这里设为空即可
            "console": "externalTerminal",//使用单独的cmd窗口输出
        },
        {//这个大括号里是我们的‘调试(Debug)’配置
            "name": "(gdb) Launch",// 配置名称
            "type": "cppdbg",// 配置类型,cppdbg对应cpptools提供的调试功能;可以认为此处只能是cppdbg
            "request": "launch",// 请求配置类型,可以为launch(启动)或attach(附加)
            "program": "${workspaceFolder}/${fileBasenameNoExtension}.exe",// 将要进行调试的程序的路径
            "args": [], // 程序调试时传递给程序的命令行参数,
            "stopAtEntry": false, // 设为true时程序将暂停在程序入口处,相当于在main上打断点
            "cwd": "${workspaceFolder}",// 调试程序时的工作目录,此处为源码文件所在目录
            "environment": [],// 环境变量,这里设为空即可
            "console": "externalTerminal",// 使用单独的cmd窗口输出
            "MIMode": "gdb", //指定连接的调试器,gdb是minGW中的调试程序
            "miDebuggerPath": "C:\\Program Files\\mingw64\\bin\\gdb.exe",//指定调试器所在路径,如果你的minGW装在别的地方,则要改成你自己的路径,注意间隔是\\
            "preLaunchTask": "echo",//调试开始前执行的任务,这里和task.json的label相对应
        }
    ]
}
注意
- 其中的
program和miDebuggerPath需要根据自己的实际情况进行修改。 - 其中的
preLaunchTask需要根据自己的实际情况进行修改。 - 其中的
args需要根据自己的实际情况进行修改。 - 其中的
console需要根据自己的实际情况进行修改。
c_cpp_properties.json
{
    "configurations": [
        {
            "name": "Win32",
            "includePath": [
                "${workspaceRoot}",
                "C:/Program Files/mingw64/include/**",
                "C:/Program Files/mingw64/bin/../lib/gcc/x86_64-w64-mingw32/8.1.0/include/c++",
                "C:/Program Files/mingw64/bin/../lib/gcc/x86_64-w64-mingw32/8.1.0/include/c++/x86_64-w64-mingw32",
                "C:/Program Files/mingw64/bin/../lib/gcc/x86_64-w64-mingw32/8.1.0/include/c++/backward",
                "C:/Program Files/mingw64/bin/../lib/gcc/x86_64-w64-mingw32/8.1.0/include",
                "C:/Program Files/mingw64/bin/../lib/gcc/x86_64-w64-mingw32/8.1.0/include-fixed",
                "C:/Program Files/mingw64/bin/../lib/gcc/x86_64-w64-mingw32/8.1.0/../../../../x86_64-w64-mingw32/include"
            ],
            "defines": [
                "_DEBUG",
                "UNICODE",
                "__GNUC__=6",
                "__cdecl=__attribute__((__cdecl__))"
            ],
            "intelliSenseMode": "msvc-x64",
            "browse": {
                "limitSymbolsToIncludedHeaders": true,
                "databaseFilename": "",
                "path": [
                    "${workspaceRoot}",
                    "C:/Program Files/mingw64/include/**",
                    "C:/Program Files/mingw64/bin/../lib/gcc/x86_64-w64-mingw32/8.1.0/include/c++",
                    "C:/Program Files/mingw64/bin/../lib/gcc/x86_64-w64-mingw32/8.1.0/include/c++/x86_64-w64-mingw32",
                    "C:/Program Files/mingw64/bin/../lib/gcc/x86_64-w64-mingw32/8.1.0/include/c++/backward",
                    "C:/Program Files/mingw64/bin/../lib/gcc/x86_64-w64-mingw32/8.1.0/include",
                    "C:/Program Files/mingw64/bin/../lib/gcc/x86_64-w64-mingw32/8.1.0/include-fixed",
                    "C:/Program Files/mingw64/bin/../lib/gcc/x86_64-w64-mingw32/8.1.0/../../../../x86_64-w64-mingw32/include"
                ]
            }
        }
    ],
    "version": 4
}
注意
- 其中的
includePath和path需要根据自己的实际情况进行修改 - 其中的
intelliSenseMode需要根据自己的实际情况进行修改 - 其中的
defines需要根据自己的实际情况进行修改
个人化配置
注意
使用 c/c++ 插件,搭配 task.json 和 launch.json 可以实现编译和调试功能。只适合单文件或单一目录下所有源文件编译为一个可执行程序文件的情况。更加复杂的情况需要使用 cmake 插件。
至少暂时我是这么处理的.
下面给出的这两个文件适用于 Linux 环境,Windows 环境需要修改对应的路径。
launch.json
{
    // 使用 IntelliSense 了解相关属性。
    // 悬停以查看现有属性的描述。
    // 欲了解更多信息,请访问: https://go.microsoft.com/fwlink/?linkid=830387
    "version": "0.2.0",
    "configurations": [
        // 编译当前文件为一个可执行程序文件
        {
            "name": "g++build-lanch", //这个应该是F1中出现的名字
            "preLaunchTask": "g++build", //在launch之前运行的任务名,这个名字一定要跟tasks.json中的任务名字大小写一致
            "type": "cppdbg",
            "request": "launch",
            "program": "${workspaceFolder}/cpp/bin/${fileBasenameNoExtension}", // 与 task.json 中编译好的路径要一致
            "args": [],
            "stopAtEntry": false, // 选为true则会在打开控制台后停滞,暂时不执行程序
            // "cwd": "${fileDirname}",    // 当前工作路径:当前文件所在的工作空间
            // fix Could not load source './csu/../csu/libc-start.c': 'SourceRequest' not supported..
            // fix 无法加载源“./libio/./libio/ioputs.c”: 'SourceRequest' not supported.。
            // 必须先安装glibc-source debian系列使用apt安装,安装后会在/usr/src/glibc/中有glibc的tar包,解压后配置为cwd的路径
            "cwd": "/usr/src/glibc/glibc-2.39",
            "environment": [],
            "externalConsole": false, // 是否使用外部控制台,选false的话,vscode可能会出现错误
            "MIMode": "gdb",
            // fix terminal other message
            // [1] + Done                       "/usr/bin/gdb" --interpreter=mi --tty=${DbgTerm} 0<"/tmp/Microsoft-MIEngine-In-osupu3wh.vza" 1>"/tmp/Microsoft-MIEngine-Out-es0r51jo.vey"
            "miDebuggerArgs": "-q -ex quit; wait() { fg >/dev/null; }; /bin/gdb -q --interpreter=mi",
            "setupCommands": [
                {
                    "description": "为 gdb 启用整齐打印",
                    "text": "-enable-pretty-printing",
                    "ignoreFailures": true
                },
                {
                    "description": "将反汇编风格设置为 Intel",
                    "text": "-gdb-set disassembly-flavor intel",
                    "ignoreFailures": true
                }
            ]
        },
        // 编译当前打开文件的目录中所有 c/cpp 源文件为一个可执行程序文件
        {
            "name": "g++build-all-lanch",
            "preLaunchTask": "g++build-all",
            "type": "cppdbg",
            "request": "launch",
            "program": "${workspaceFolder}/cpp/bin/main",
            "args": [],
            "stopAtEntry": false,
            "cwd": "/usr/src/glibc/glibc-2.39",
            "environment": [],
            "externalConsole": false,
            "MIMode": "gdb",
            "miDebuggerArgs": "-q -ex quit; wait() { fg >/dev/null; }; /bin/gdb -q --interpreter=mi",
            "setupCommands": [
                {
                    "description": "为 gdb 启用整齐打印",
                    "text": "-enable-pretty-printing",
                    "ignoreFailures": true
                },
                {
                    "description": "将反汇编风格设置为 Intel",
                    "text": "-gdb-set disassembly-flavor intel",
                    "ignoreFailures": true
                }
            ]
        }
    ]
}
task.json
{
    // See https://go.microsoft.com/fwlink/?LinkId=733558
    // for the documentation about the tasks.json format
    "version": "2.0.0",
    "tasks": [
        // 编译当前文件为一个可执行程序文件
        {
            "label": "g++build", // 任务的名字,注意是大小写区分的,等会在launch中调用这个名字
            "type": "shell", // 任务执行的是shell命令
            "command": "g++", // 命令是g++
            "args": [
                "'-Wall'", // 开启所有警告
                "'-std=c++23'", //使用c++23标准编译
                "'${file}'", // 当前文件名
                "-o", //对象名,不进行编译优化
                "${workspaceFolder}/cpp/bin/${fileBasenameNoExtension}",
                "-g" // 启用调试信息
            ],
            // 所以以上部分,就是在shell中执行(假设文件名为filename.cpp)
            // g++ filename.cpp -o filename
            "group": {
                "kind": "build",
                "isDefault": true,
                // 任务分组,因为是tasks而不是task,意味着可以连着执行很多任务
                // 在build组的任务们,可以通过在Command Palette(F1) 输入run build task来运行
                // 当然,如果任务分组是test,你就可以用run test task来运行
            },
            "problemMatcher": "$gcc", // 使用gcc捕获错误
            "presentation": { // 配置用于显示任务输出并读取其输入的面板
                "echo": true, // 控制是否将执行的命令显示到面板中。默认值为“true”。
                "reveal": "always", // 控制运行任务的终端是否显示。可按选项 "revealProblems" 进行替代。默认设置为“始终”。always: 总是在此任务执行时显示终端。
                "focus": false, // 控制面板是否获取焦点。默认值为“false”。如果设置为“true”,面板也会显示。
                "panel": "shared", // 控制是否在任务间共享面板。同一个任务使用相同面板还是每次运行时新创建一个面板。
                "showReuseMessage": true, // 控制是否显示“终端将被任务重用,按任意键关闭”提示。
                "clear": false, //控制是否在执行任务之前清除终端。
            }
        },
        // 编译当前打开文件的目录中所有 c/cpp 源文件为一个可执行程序文件
        {
            "label": "g++build-all",
            "type": "shell",
            "command": "g++",
            "args": [
                "-Wall",
                "-std=c++23",
                "${fileDirname}/*.c*",
                "-o",
                "${workspaceFolder}/cpp/bin/main",
                "-g"
            ],
            "group": {
                "kind": "build",
                "isDefault": true,
            },
            "problemMatcher": "$gcc",
            "presentation": {
                "echo": true,
                "reveal": "always",
                "focus": false,
                "panel": "shared",
                "showReuseMessage": true,
                "clear": false,
            }
        }
    ]
}
可能遇到的问题
程序运行之后终端多出一行提示内容
问题描述
[1] + Done "/usr/bin/gdb" --interpreter=mi --tty=${DbgTerm} 0<"/tmp/Microsoft-MIEngine-In-osupu3wh.vza" 1>"/tmp/Microsoft-MIEngine-Out-es0r51jo.vey"问题分析
该提示是shell作业控制(Job Control)的输出,源于以下原因:
- VS Code调试时通过MI接口(Machine Interface)与gdb交互
- 调试器进程结束后,shell会输出进程结束状态
- 默认的调试参数未正确抑制后台进程状态提示
该提示是GDB调试器正常退出时的状态信息。由于VS Code调试器与GDB的交互方式,当使用外部终端(externalTerminal)时,调试结束后终端会保留进程结束信息。这属于调试器正常退出的提示信息,不会影响程序实际执行结果。
解决方法
在launch.json中修改以下选项
"miDebuggerArgs": "-q -ex quit; wait() { fg >/dev/null; }; /bin/gdb -q --interpreter=mi",参数包括 -q(安静模式),-ex quit(执行quit命令),以及一些shell命令。这些参数的作用可能是让gdb在结束后安静地退出,避免触发shell的作业控制消息。具体来说,-q 参数让gdb不显示版本和启动信息,-ex quit 让gdb在完成调试后立即退出,而后续的shell命令可能是为了处理进程的等待和前台化,避免产生作业控制的通知。
找不到一些源文件的问题
问题描述
Could not load source './csu/../csu/libc-start.c': 'SourceRequest' not supported..

# 或者中文环境提示为
无法加载源“./libio/./libio/ioputs.c”: 'SourceRequest' not supported.。
可能提示找不到的文件不同, 但是都是因为找不到源文件导致的.使用step into调试c语言内建函数时就会出现这种情况.
问题分析
vscode的调试功能是使用gdb来实现的, 而gdb是使用libc来实现的, 所以在调试c语言内建函数时, vscode会找不到源文件.
解决方法
需要安装glibc-source,对于 debian 系的发行版, 使用以下命令安装
sudo apt install glibc-source安装完成后进行解压
cd /usr/src/glibc/
sudo tar -xvf glibc-2.36.tar.xz
在launch.json中修改以下选项
"cwd": "/usr/src/glibc/glibc-2.36",
// 调试程序时的工作目录,此处为源码文件所在目录, 改为glibc的源码目录
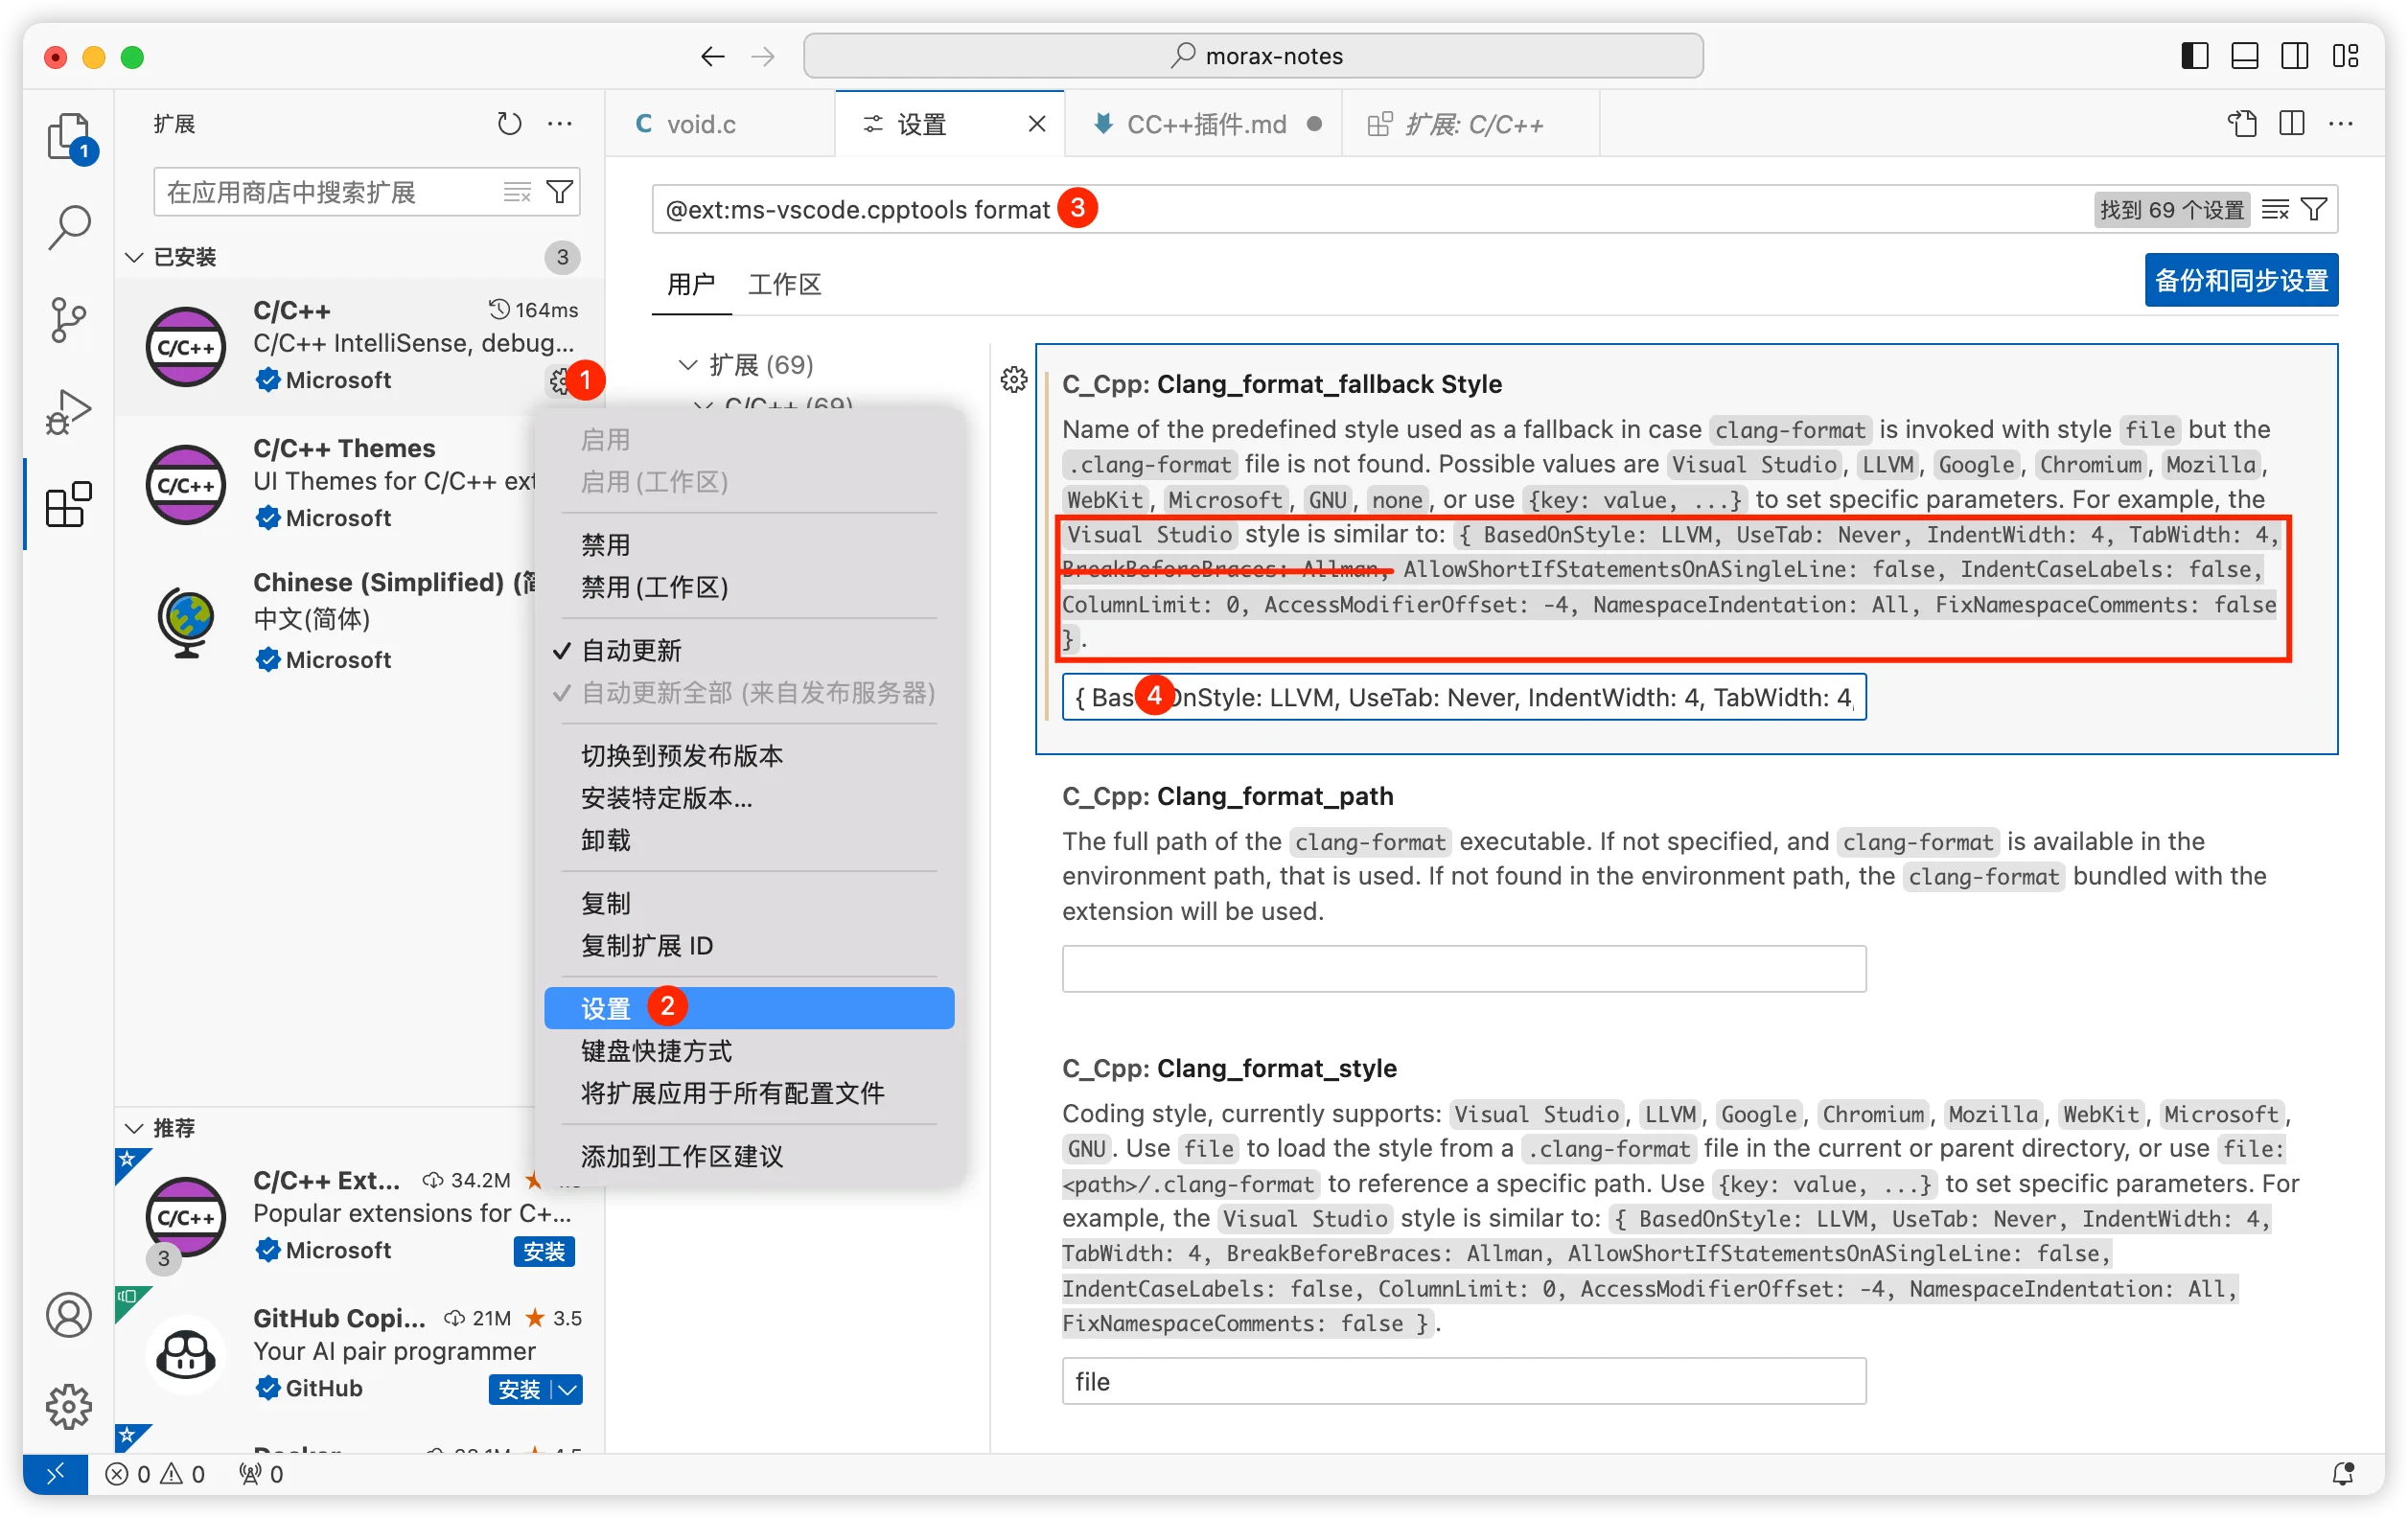
// 注意版本号不同路径也不同. 以本机安装的路径为准设置format格式
按图设置即可
打开插件的设置,然后搜索
format,将给出的示例拷贝粘贴到输入框中。json{ BasedOnStyle: LLVM, UseTab: Never, IndentWidth: 4, TabWidth: 4, BreakBeforeBraces: Allman, AllowShortIfStatementsOnASingleLine: false, IndentCaseLabels: false, ColumnLimit: 0, AccessModifierOffset: -4, NamespaceIndentation: All, FixNamespaceComments: false }如果想要函数体的花括号跟在参数后面而不是另起一行就删除
BreakBeforeBraces: Allman,
CMake插件
在WSL中安装以下软件
- cmake
- make或者ninja(推荐ninja,比较快)
然后在VS Code中安装插件
- CMake安装在WSL: Ubuntu中
- CMake Tools安装在WSL: Ubuntu中
然后编写CMakeLists.txt以及测试文件
.
├── CMakeLists.txt
├── head.h
├── hello.c
└── test.cPROJECT(Hello)
add_executable( Hello head.h hello.c test.c )#ifndef __HEAD_H__
#define __HEAD_H__
#include <stdio.h>
void test(void);
#endif#include "head.h"
int main() {
test();
return 0;
}#include "head.h"
void test(void) { printf("Hello World!\n"); }测试可用后即可通过编写CMakeLists.txt文件来管理项目,不管是单文件还是多文件都可以使用CMake来管理.
优化设置
{
    // "clangd.path": "/usr/local/Cellar/llvm/15.0.6/bin/clangd", //Mac 下使用brew安装llvm时启用
    // "clangd.path": "/opt/homebrew/Cellar/llvm/15.0.6/bin/clangd", // M1 Mac下使用brew安装llvm时启用
    "files.autoSave": "afterDelay",
    "files.autoGuessEncoding": true,
    "workbench.list.smoothScrolling": true,
    "editor.cursorSmoothCaretAnimation": true,
    "editor.smoothScrolling": true,
    "editor.cursorBlinking": "smooth",
    "editor.mouseWheelZoom": true,
    "editor.formatOnPaste": true,
    "editor.formatOnType": true,
    "editor.formatOnSave": true,
    "editor.wordWrap": "on",
    "editor.guides.bracketPairs": true,
    //"editor.bracketPairColorization.enabled": true, (此设置vscode在较新 版本已默认开启)
    "editor.suggest.snippetsPreventQuickSuggestions": false,
    "editor.acceptSuggestionOnEnter": "smart",
    "editor.suggestSelection": "recentlyUsed",
    "window.dialogStyle": "custom",
    "debug.showBreakpointsInOverviewRuler": true,
    "clangd.arguments": [
        "--compile-commands-dir=${workspaceFolder}/build",
        "--header-insertion=never"
    ],
    "clang-format.assumeFilename": "${workspaceFolder}/.clang-format",
    "clang-format.executable": "/usr/bin/clang-format",
    "explorer.confirmDelete": false, //VS Code Git配置
    "http.proxyStrictSSL": false,
    "git.enableSmartCommit": true,
    "git.confirmSync": false,
    "git.autofetch": true,
}
代码格式化
使用clang-format进行代码格式化,在工作区目录下新建 .clang-format 文件
# Generated from CLion C/C++ Code Style settings
BasedOnStyle: LLVM
AccessModifierOffset: -4
AlignAfterOpenBracket: Align
# AlignConsecutiveAssignments: None
# AlignOperands: Align
AllowAllArgumentsOnNextLine: false
AllowAllConstructorInitializersOnNextLine: false
AllowAllParametersOfDeclarationOnNextLine: false
AllowShortBlocksOnASingleLine: Always
AllowShortCaseLabelsOnASingleLine: false
AllowShortFunctionsOnASingleLine: All
AllowShortIfStatementsOnASingleLine: Always
AllowShortLambdasOnASingleLine: All
AllowShortLoopsOnASingleLine: true
AlwaysBreakAfterReturnType: None
AlwaysBreakTemplateDeclarations: Yes
BreakBeforeBraces: Custom
BraceWrapping:
  AfterCaseLabel: false
  AfterClass: false
  AfterControlStatement: Never
  AfterEnum: false
  AfterFunction: false
  AfterNamespace: false
  AfterUnion: false
  BeforeCatch: false
  BeforeElse: false
  IndentBraces: false
  SplitEmptyFunction: false
  SplitEmptyRecord: true
BreakBeforeBinaryOperators: None
BreakBeforeTernaryOperators: true
BreakConstructorInitializers: BeforeColon
BreakInheritanceList: BeforeColon
ColumnLimit: 0
CompactNamespaces: false
ContinuationIndentWidth: 8
IndentCaseLabels: true
IndentPPDirectives: None
IndentWidth: 4
KeepEmptyLinesAtTheStartOfBlocks: true
MaxEmptyLinesToKeep: 2
NamespaceIndentation: All
ObjCSpaceAfterProperty: false
ObjCSpaceBeforeProtocolList: true
PointerAlignment: Right
ReflowComments: false
SpaceAfterCStyleCast: true
SpaceAfterLogicalNot: false
SpaceAfterTemplateKeyword: false
SpaceBeforeAssignmentOperators: true
SpaceBeforeCpp11BracedList: false
SpaceBeforeCtorInitializerColon: true
SpaceBeforeInheritanceColon: true
SpaceBeforeParens: ControlStatements
SpaceBeforeRangeBasedForLoopColon: false
SpaceInEmptyParentheses: false
SpacesBeforeTrailingComments: 0
SpacesInAngles: false
SpacesInCStyleCastParentheses: false
SpacesInContainerLiterals: false
SpacesInParentheses: false
SpacesInSquareBrackets: false
TabWidth: 4
UseTab: Never
快捷代码片段
可以新建当前用户的代码片段文件, 也可以新建当前工作区的代码片段文件.新建当前工作区的代码片段需要指定 "scope": "适配的编程语言名",, 例如 "scope": "c, cpp",
C语言
{
	// Place your snippets for c here. Each snippet is defined under a snippet name and has a prefix, body and
	// description. The prefix is what is used to trigger the snippet and the body will be expanded and inserted. Possible variables are:
	// $1, $2 for tab stops, $0 for the final cursor position, and ${1:label}, ${2:another} for placeholders. Placeholders with the
	// same ids are connected.
	// Example:
	// "Print to console": {
	// 	"prefix": "log",
	// 	"body": [
	// 		"console.log('$1');",
	// 		"$2"
	// 	],
	// 	"description": "Log output to console"
	// }

	"C语言main函数有参数形式": {
		"prefix": "cm",
		"body": [
			"/**",
            "  * ${1:Description}",
            "  *",
            "  */",
			"",
			"",
			"#include <stdio.h>",
			"",
			"",
			"int main(int argc, char *argv[]) {",
			"\t${2:// Write your code}",
			"",
			"\treturn 0;",
			"}"
		],
		"description": "快速建立C语言main函数结构"
	},
	"C语言main函数无参数形式": {
		"prefix": "cmv",
		"body": [
			"/**",
            "  * ${1:Description}",
            "  *",
            "  */",
			"",
			"",
			"#include <stdio.h>",
			"",
			"",
			"int main(void) {",
			"\t${2:// Write your code}",
			"",
			"\treturn 0;",
			"}"
		],
		"description": "快速建立C语言main函数结构"
	},
}
C++快捷代码片段
{
	// Place your snippets for cpp here. Each snippet is defined under a snippet name and has a prefix, body and
	// description. The prefix is what is used to trigger the snippet and the body will be expanded and inserted. Possible variables are:
	// $1, $2 for tab stops, $0 for the final cursor position, and ${1:label}, ${2:another} for placeholders. Placeholders with the
	// same ids are connected.
	// Example:
	// "Print to console": {
	// 	"prefix": "log",
	// 	"body": [
	// 		"console.log('$1');",
	// 		"$2"
	// 	],
	// 	"description": "Log output to console"
	// }
	"C++ main函数有参数形式": {
		"prefix": "cm",
		"body": [
			"/**",
            "  * ${1:Description}",
            "  *",
            "  */",
			"",
			"",
			"#include <iostream>",
			"",
			"",
			"int main(int argc, char *argv[]) {",
			"\t${2:// Write your code}",
			"",
			"\treturn 0;",
			"}"
		],
		"description": "快速建立C++ main函数结构"
	},
	"C++ main函数无参数形式": {
		"prefix": "cmv",
		"body": [
			"/**",
            "  * ${1:Description}",
            "  *",
            "  */",
			"",
			"",
			"#include <iostream>",
			"",
			"",
			"int main(void) {",
			"\t${2:// Write your code}",
			"",
			"\treturn 0;",
			"}"
		],
		"description": "快速建立C++ main函数结构"
	},
}