可变参数模板
可变参数模板是C++中的一种重要的模板类型,它允许你在模板中定义一个可变数量的参数列表,并且可以在运行时根据需要动态地调整这些参数。
使用可变参数模板的好处是,你可以在模板中定义任意数量的参数,并且可以根据需要动态地调整这些参数。这使得模板的功能更加灵活和强大,可以用于各种不同的场景。
可变参函数模板
可变参数模板的基本语法如下:
template <typename... Args>
class VariableLengthTemplateClass {
public:
    // 定义模板实例
    VariableLengthTemplateClass(Args... args);

    // 定义模板实例的成员函数
    void doSomething();

private:
    // 定义模板实例的私有成员
    Args m_args;
};在上面的代码中,VariableLengthTemplateClass是一个模板类,它使用了template关键字来定义模板实例。Args...是一个可变数量的参数列表,它允许你在模板中定义任意数量的参数。
在模板实例中,VariableLengthTemplateClass定义了两个成员函数:doSomething()和VariableLengthTemplateClass(Args... args)。doSomething()是模板实例的公有成员函数,它接受一个可变数量的参数列表作为参数,并根据需要动态地调整这些参数。VariableLengthTemplateClass(Args... args)是模板实例的构造函数,它接受一个可变数量的参数列表作为参数,并将这些参数存储在模板实例的私有成员m_args中。
简单范例
点击查看代码
#include <iostream>
using namespace std;

template <typename ... T>
void func(T... args) {
    cout << sizeof...(args) << endl;
    cout << sizeof...(T) << endl;
}

int main(int argc, char *argv[]) {
    func();
    func(10, 20);
    func(1, 2.45, "abc", 50);

    return 0;
}
程序输出:
0
0
2
2
4
4
值得注意的是:
- 我们一般把
args称为是一包或者一堆参数,而这些参数的类型可以各不相同;- 我们理解
T这种类型的时候,不能理解成一个类型;而应该理解成多个不同的类型,那自然aegs对应的参数也是多个不同类型的参数。
- 我们理解
- 这一包参数中可以有0个或者任意个参数,而且这些参数可以为任意类型;
T后面带…,所以我们称呼T为可变参类型,这个东西看起来是一个类型名,实际上里面包含的是0个或者任意个类型(简单来说就是包含了一包的类型);args我们称呼为可变参类型形参,那既然T代表的是一包类型,那args代表的就是一包形参;
有了上面一个简单的例子我们知道了可变参函数模板是什么,我们再看另外一个例子
点击查看代码
#include <iostream>
using namespace std;

template <typename T,typename ... U>
void func(const T& firstarg, const U&... otherargs) {
    cout << sizeof...(otherargs) << endl;
    cout << sizeof...(U) << endl;
}

int main(int argc, char *argv[]) {
    func(10);
    func(10, 20, "abc");

    return 0;
}
程序输出:
0
0
2
2通过上面两个例子我们展示了可变参函数模板的最基本的获取参数的个数,使用的是sizeof...运算符;在实际开发中,只获取参数的个数显然没有什么实际的用途,更重要的是使用这些传递进来的参数,具体如何使用,就要学习下一节参数包的展开了。
参数包的展开
参数包展开的套路都比较固定,一般都是使用递归函数进行展开。这就要求我们,就是通过这两个函数把参数包展开的。
在实际开发中,一般都会把第一个参数和其余的参数包分开,就是上面案例中第二个案例的样式。
点击查看代码
#include <iostream>
using namespace std;

//递归终止函数
void func(){
    cout << "\n调用了递归终止函数" << endl;
}

template <typename T,typename ... U>
void func(const T& firstarg, const U&... otherargs) {
    cout << firstarg << " ";
    func(otherargs...); //调用递归函数,注意写法不要缺少...
}

int main(int argc, char *argv[]) {
    func(10, 20, "abc");

    return 0;
}
程序输出:
10 20 abc
调用了递归终止函数
可变参类模板
可变参数模板类实际上就是一个模板类,参数是可变的。它可以表示0到任意个数、任意类型的参数。可变模版参数无疑是一个巨大的进步。使用可变参数模板时通常离不开模板参数的展开,所以我们可以通过展开参数包的方式来获取参数包中的每个参数。
例如,我们可以使用递归函数方式展开,逗号表达式展开,enable_if方式展开和折叠表达式展开(C++ 17)等方法来展开参数包。
点击查看代码
#include <iostream>
using namespace std;

//主模板定义,没有该定义会报错
template <typename... Args>
class TestClass {};

template <typename firstarg, typename... otherarg>
class TestClass<firstarg, otherarg...> :private TestClass<otherarg...> {
public:
    TestClass() {
        printf("TestClass默认构造函数调用了,this地址:%p\n", this);
    }
};

int main(int argc, char *argv[]) {
    TestClass<int, double> ts1;

    return 0;
}
程序输出:
TestClass默认构造函数调用了,this地址:0x7ffd3e96ca2f
TestClass默认构造函数调用了,this地址:0x7ffd3e96ca2f
上面就是一个最简单的可变参类模板的定义,其中有几个点需要注意:
- 必须先定义一个主模板,否则程序无法编译;
- 主模板的模板参数为一个类型包;
- 然后定义一个特化版本,特化版本接受一个参数和一个参数包并且私有继承自主模板;
通过递归继承方式展开参数包
知道了可变参类模板的定义方式(上面例子中已经通过递归的方式进行编写了),下面我们来改造上面的例子,为其添加有参构造函数,让它更实用一点
点击查看代码
#include <iostream>
using namespace std;

template <typename... Args>
class TestClass {};

template <typename firstarg, typename... otherarg>
class TestClass<firstarg, otherarg...> :private TestClass<otherarg...> {
public:
    TestClass() {
        printf("TestClass默认构造函数调用了,this地址:%p\n", this);
    }
    TestClass(firstarg tmpvalue, otherarg...otmpvalue) :TestClass<otherarg...>(otmpvalue...) {
        printf("TestClass有参构造函数调用了,this地址:%p。当前参数值是:", this);
        cout << tmpvalue << endl;
    }
};

int main(int argc, char *argv[]) {
    TestClass<int, double> ts1;
    TestClass<int, double, const char*> ts2(10, 22.5, "Hello CPP");

    return 0;
}
程序输出:
TestClass默认构造函数调用了,this地址:0x7fff50b252bf
TestClass默认构造函数调用了,this地址:0x7fff50b252bf
TestClass有参构造函数调用了,this地址:0x7fff50b252be。当前参数值是:Hello CPP
TestClass有参构造函数调用了,this地址:0x7fff50b252be。当前参数值是:22.5
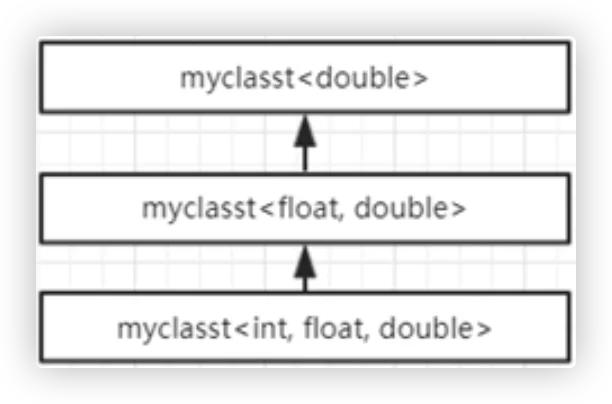
TestClass有参构造函数调用了,this地址:0x7fff50b252be。当前参数值是:10可以看到,程序输出的顺序与我们调用时传入实参的顺序刚好相反。递归调用展开参数包的继承顺序如下:
如果我们将程序中增加一个空参数的特化版本,那么递归调用的时间就会最先调用空参数的特化版本
点击查看代码
#include <iostream>
using namespace std;

template <typename... Args>
class TestClass {};

template<>
class TestClass<>{
    public:
        TestClass(){
            printf("TestClass<>默认构造函数调用了,this地址:%p\n", this);
        }
};

template <typename firstarg, typename... otherarg>
class TestClass<firstarg, otherarg...> : private TestClass<otherarg...>{
    public:
        TestClass(){
            printf("TestClass默认构造函数调用了,this地址:%p\n", this);
        }
        TestClass(firstarg tmpvalue, otherarg...otmpvalue) : TestClass<otherarg...>(otmpvalue...){
            printf("TestClass有参构造函数调用了,this地址:%p。当前参数值是:", this);
            cout << tmpvalue << endl;
        }
};

int main(int argc, char *argv[]){
    TestClass<int, double, const char*> ts2(10, 22.5, "Hello CPP");

    return 0;
}
程序输出:
TestClass<>默认构造函数调用了,this地址:0x7ffe9fce452f
TestClass有参构造函数调用了,this地址:0x7ffe9fce452f。当前参数值是:Hello CPP
TestClass有参构造函数调用了,this地址:0x7ffe9fce452f。当前参数值是:22.5
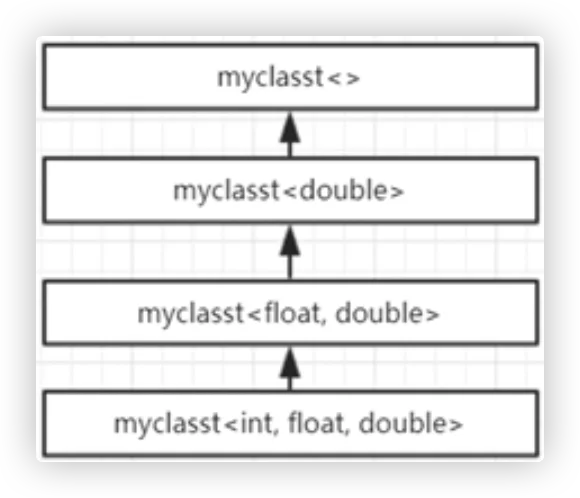
TestClass有参构造函数调用了,this地址:0x7ffe9fce452f。当前参数值是:10通过程序运行结果分析可以得到递归调用顺序如下:
通过递归组合方式展开参数包
在讲这种展开参数包的方式之前,我们必须要了解什么是组合方式。组合关系也叫做复合关系,是指一个类的成员变量中包含着另一个类的对象,这种关系就叫组合关系。
class A {
public:
    //...
};

class B {
public:
    //...

    A m_a;
};类A与类B就是组合关系,使用流程图表示如下(其中黑色实心菱形的一边表示包含的一方,箭头指向的一方则表示被包含的一方)

那么应用到实际代码中的话,就是使用参数多的类包含着参数少的类,我们可以将上面的实例改造如下
点击查看代码
#include <iostream>
#include <cstdio>
using namespace std;

template <typename... Args>
class TestClass {};

template<>
class TestClass<>
{
public:
    TestClass()
    {
        printf("TestClass<>默认构造函数调用了,this地址:%p\n", this);
    }
};

template <typename firstarg, typename... otherarg>
class TestClass<firstarg, otherarg...> //: private TestClass<otherarg...>
{
public:
    TestClass()
    {
        printf("TestClass默认构造函数调用了,this地址:%p\n", this);
    }
    TestClass(firstarg tmpvalue, otherarg...otmpvalue) :m_ftc(tmpvalue), m_tc(otmpvalue...)// : TestClass<otherarg...>(otmpvalue...)
    {
        printf("TestClass有参构造函数调用了,this地址:%p。当前参数值是:", this);
        cout << m_ftc << endl;
    }
    firstarg m_ftc;
    TestClass<otherarg...> m_tc;
};

int main(int argc, char *argv[])
{
    TestClass<int, double, const char*> ts2(10, 22.5, "Hello CPP");

    return 0;
}
程序输出:
TestClass<>默认构造函数调用了,this地址:0x7fff5bd303e8
TestClass有参构造函数调用了,this地址:0x7fff5bd303e0。当前参数值是:Hello CPP
TestClass有参构造函数调用了,this地址:0x7fff5bd303d8。当前参数值是:22.5
TestClass有参构造函数调用了,this地址:0x7fff5bd303d0。当前参数值是:10通过程序的运行结果,我们可以看到this的地址是不相同的,也就是说递归调用的方式指创建了一个类对象,而递归组合的方式创建了多个类对象。不过在测试这个特性的时间也发现了一个有趣的问题:那就是如果成员变量中如果只有TestClass<otherarg...> m_tc;这一个成员变量,那this的地址还是相同的。
上面实例中类的组合关系,使用流程图表示如下

通过tuple和递归调用展开参数包
这种展开参数包的方式需要写类的特化版本,有一定的难度。我们看一看,认识一下这种形式就好,并不一定非要掌握这种方式。
实现思路:定义一个计数器,每处理一个参数计数器加1,直到把所有参数处理完;最后搞一个模板偏特化来作为递归调用结束的处理。
tuple是一个元组,是一种容器类型,它可以存储任意类型的元素,并且支持元素之间的交换和拷贝。它的语法与C++11中引入的std::tuple类似,但是它是作为C++17标准的一部分引入的。
#include <iostream>
#include <tuple>    //使用tuple需要引入头文件
using namespace std;

int main(int argc, char *argv[]) {
    tuple<int, double, const char*> mytuple(10, 22.5, "Hello CPP"); //这就是一个tuple(元组),一堆各种东西的组合

    //打印元组中的元素
    cout << get<0>(mytuple) << " ";
    cout << get<1>(mytuple) << " ";
    cout << get<2>(mytuple) << endl;

    return 0;
}
程序输出:
10 22.5 Hello CPP点击查看代码
#include <iostream>
#include <tuple>
using namespace std;

//定义下面tuple需要使用的可变参类模板
template <int count, int maxcnt, typename ...T>
class TestClass {
public:
    static void func(const tuple <T...>& t) {
        cout << "value[" << count << "]= " << get<count>(t) << endl;
        TestClass < count+1, maxcnt, T...> ::func(t);   //递归调用
    }
};

//需要一个特化版本,结束递归调用
template <int maxcnt, typename ...T>
class TestClass<maxcnt, maxcnt, T...> {
public:
    static void func(const tuple <T...>& t) { }
};

template <typename ...T>
void func(const tuple<T...>& t) {   //可变参数模板
    TestClass<0, sizeof...(T), T...>::func(t);
}

int main(int argc, char *argv[]) {
    tuple<int, double, const char*> mytuple(10, 22.5, "Hello CPP");

    func(mytuple);

    return 0;
}
程序输出:
value[0]= 10
value[1]= 22.5
value[2]= Hello CPP
总结
获取参数包内参数的方式有多种,但是一般都离不开递归手段。
模板模板参数
一个模板的参数是模板类型。
点击查看代码
#include <vector>
#include <list>
#include <iostream>
using namespace std;

template <typename T, template <class> class Container> //第一种定义模板模板参数的语法

/**
* 上面模板声明/定义的语法中,T是模板参数,是一个类型模板参数,我们定义一般的模板都是使用这种语法
*   - Container也是一个模板参数,是一个 模板模板参数,这个模板参数本身又是一个模板
*
* 因为在模板类型的声明及定义中使用class关键字和使用typename关键
* 字的效果是一样的,所以下面两种方式的效果与第一种方式的效果一样
*
* template <typename T, template <typename W> typename Container>
* template <class T, template <class W> class Container>
*
* 只是这两种方式中的W都是只占位符,没有一丁点的实际作用
*/

class TestClass {
public:
    void func() {
        for (int i = 0; i < 10; ++i) {
            m_container.push_back(i);   //使用这句话必须注意需要传入的容器支持push_back的操作,如果不支持程序将报错
        }
    }
    void print() {
        for (auto iterm : m_container) {    //使用范围for语句便利打印m_container中的元素
            cout << iterm << " ";
        }
        cout << endl;
    }
public:
    T m_t;
    Container<T> m_container;
    /**
    * Container是作为类模板来使用的,因为其后面跟着<>,所以它是个类模板
    * 要想把它当作类模板使用,上面模板声明/定义的地方就必须使用 模板模板参数的语法
    */
};

/*  注释01
template <typename T>
using myVec = vector<T, allocator<T>>;

template <typename T>
using myList = list<T, allocator<T>>;
*/

int main(int argc, char *argv[]) {
    TestClass<int, vector> tcVec;
    tcVec.func();
    tcVec.print();

    /**
    * 按照课程说明,这里不能直接传入vector类型,是因为使用vector容器的时间需要
    * 指定allocator模板参数,但是我这里使用MSVC 143(也就是)VS 2022和
    * GCC 11.2.0正常编译运行,没有问题;但是换到clang 16.0.0和GCC 8.1.0中就无法通过编译
    */

    /*  注释02
    TestClass<int, myVec> tcVec;
    */

    return 0;
}
程序输出:
0 1 2 3 4 5 6 7 8 9